How to Validate Aadhaar Card Signature Validation or Procedure on eAadhaar Digital Signature Validate in PDF File….
Showing the credibility of a document or any digital message is very important and that is why we need a valid digital signature on e-Aadhaar. A digital signature on e-Aadhaar is basically a mathematical scheme which proves the genuineness of a digital message or document. Digital signatures that are validated make a person who is receiving the message know that it is authentic and from a sender who is known.
With a valid digital signature, the person who has signed the message cannot deny doing so as it acts as evidence of the signature. Aadhaar Card Signature Validation or eAadhaar Digital Signature Validation is quite a simple process that can be completed by anyone within a short time.
Validating digital signatures on e-aadhaar is of great importance and is mainly done because of the following reasons:
- Provides data integrity as it ensures that no information in the message is tampered with by any other person as it is being transmitted. Once the signature has been placed, any information added to the message will render the signature useless and invalid.
- Validating electronics ensures that the source of the message is authentic and has not been altered by a third party. It acts as proof that a given person was involved in coming up with the message or document.
- Prevent a signer of the certificate from declining that the signature in the message is theirs. This is because it acts as evidence as the sign can be clearly seen.
In order to Validate eAadhaar Card digital signature, one must have access to the internet and a device such as a computer that will allow usage of the internet. Choosing a suitable browser such as Mozilla Firefox or Chrome is also important so as to easily view the Aadhar website without encountering unnecessary traffic. For faster validation of the digital signature, a faster internet speed is necessary so as to quickly navigate the e-aadhar portal. A slow network will mean that different pages that are to be opened will take longer than expected thus slowing down your efforts of validating the digital signatures.
eAadhaar Digital Signature Validation / How to Validate Aadhaar Card Signature Validation on EAadhaar PDF file
If you discover that your e-aadhar portal displays a “Validity unknown” icon, then it means that the digital signature has not been validated. To validate Aadhaar Card Signature Validation without incurring any problems, one should follow the step-by-step procedure that is given below:
- First and foremost, one needs to gain access to the e-Aadhaar portal for them to validate eAadhaar digital signature. This done by using eaadhaar. uidai . gov.in link which will directly take you to the e-Aadhaar portal. Key in this link on your browser whether chrome or Mozilla Firefox and search. Once inside the portal, digital signatures validation can be swiftly done by correctly following the instructions that are well explained in the portal.
- Using your mouse, right click on the “validity unknown” icon that is displayed on the e-aadhar portal accessed. After doing this, click on “validate signature” to start the process of Aadhaar Card Digital Signature Validation.
- After clicking on validate signature, a new window will be opened in the portal. This window is known as the signature validation status window. From this window, click on “signature properties”
- Once the signature properties has been successfully opened, click on “Show Signer’s Certificate” By clicking on this, you will be able to see the certificate of the person who signed the message or document.
- Carefully examining the signer’s certificate, look if a certification path named “NIC CA 2011” is available. This certification path recognizes NIC CA as the owner of the digital certificate rights that has been used when the document was being signed. It also shows that the rights to validate digital signature on e-aadhar portal is currently being held by NIC CA.
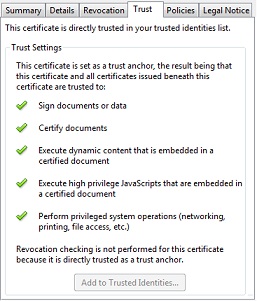
- You should then mark the path of certification named NIC CA 2011 followed by clicking on the “Trust” tab. After successfully doing this click on “Add to Trusted Certificate” so as to make NIC CA the trusted certificate. If by any chance a question is asked, you should give “Ok” as the response.
- Next, a new window known as the “Acrobat Security” will be opened. In this window, click on Ok and continue with the validation process.
- Checking whether the field for “Use this certificate as a Trusted root” is correctly selected with a tick sign is the next step that should be followed. After you are done with this, click on “Ok” two times in order for you to close the current window and the window that will follow.
- Finally, click on “Validate signature” to begin the process of validating the digital signatures.
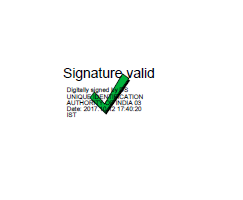
- Once you are done with the validation, you should not be in a hurry to exit the portal. Wait until you see a green sign which means that the process of validation is over and one has successfully validated the digital signatures on e-aadhar. If the green sign is not displayed, then the validation process has not been completed and needs to be repeated.
By following the above explained procedure, Validating the Aadhaar Card Signature Validation in e-aadhaar pdf file becomes a simple thing to do within the shortest time possible. Below is a simplified step-by-step process of validating digital signatures on e-aadhar:
- Get access to internet connection and internet accessing device.
- Access the e-aadhar portal using https://eaadhaar. uidai. gov.in/
- Right click on “Validity Unknown” icon followed by clicking “Validate Signature”.
- Click on “Show Signer’s Certificate” on the signature validation status window.
- Verify the availability of a path certificate known as “NIC CA 2011”.
- Mark the path of certification named NIC CA, click on the “Trust” tab and then click “Add to trusted certificate”.

- Click ok to any question that pops up.
- Click “Ok” on the Acrobat Security window.
- Verify the field for “Use this Certificate as a Trusted Root” and click twice on “Ok” to close the current and next window.
- Click “validate signature” to start digital signature validation.

- Wait for a Green Sign (Green Color Tick Mark) that shows successful validation of the digital signature on e-Aadhaar.
